马上注册,享用更多功能
您需要 登录 才可以下载或查看,没有账号?立即注册

×
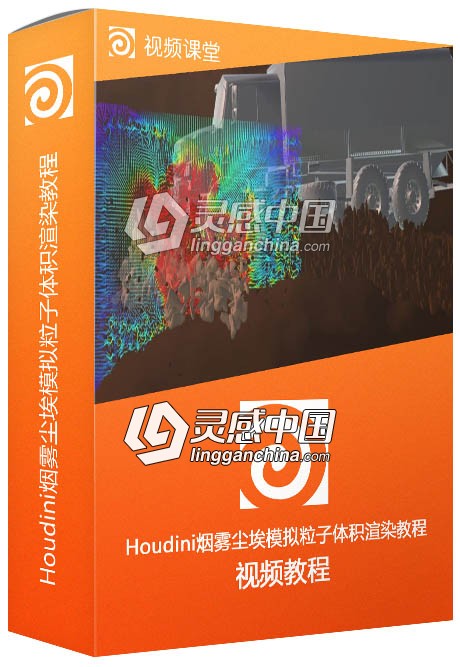
本Houdini教程是由灵感素材分享站LGZIYUAN.COM整理的Houdini烟雾尘埃模拟粒子体积渲染大师级训练视频教程,时长:8小时26分,大小:3 GB,MP4高清视频格式,教程使用软件:Houdini 18,附源文件,共16个章节,作者:Radu Cius,语言:英语。
LGZIYUAN.COM分享。
Houdini是一个特效方面非常强大的软件。许多电影特效都是由它完成:《指环王》中“甘道夫”放的那些“魔法礼花”,还有“水马”冲垮“戒灵”的场面,后天中的龙卷风等等,a52的汽车广告,反正只要是涉及DD公司制作的好莱坞一线大片,几乎都会有Houdini参与和应用。
Houdini不光只适用于视觉特效的制作,随着HOUDINI适用于各种平台,并且出现了很多的HOUDINI培训教学,HOUDINI开始进入了动态图像设计领域。因为其自身的流程化特性,加上其强大的动力学系统,让HOUDINI在数据可视化方面占有一席重要的地位,让图形设计师能够通过它表达自己的观点。
Any great looking impact is supported by the crucial volumetric component. Getting volumetric clouds of dust and particulates moving and rendering correctly can often prove a challenging task for juniors and seniors alike. This course focuses on generating great looking volumetric dust based on impacts and preparing you to be able to adapt these types of simulations to art direction.
The course begins with preparing and optimizing the assets to ready them for fast iteration during the shot production process. It then dives into the often scary world of DOPs by building a smoke simulation network, which will allow you to both demystify and master the workflow. Great care will be taken in studying the crucial step of the volume sourcing emission. You will see how to avoid stepping, as well as inject as many details in the simulation right from the emission by extracting useful data from the RBD animation.
Collisions will be covered as well, and we will see how to visualize them correctly to troubleshoot any collider related issue. And velocity noise will be added separately to have finer control on our emission. Finally, we will further direct and complexify our simulation by layering forces thanks to DOP micro-solvers. To assist us in this task, we will build our own fields and use them as masks to precisely disturb or damp relevant parts of our simulation.
The important part of lighting and rendering will also be covered, using Mantra in this process. You will see how to use lights to shape the volume and reveal its finer details. Houdini’s Pyro shader for smoke is covered as well as learning how to extract useful information from lights and simulation fields to build AOVs, shadow passes, as well as technical passes for compositing.
From blocking the simulation to choosing the final render resolution, we will build and automate our workflow aiming at iteration speed, which is key in any shot production process. And because FX simulations can be very consuming and demanding on a studio’s infrastructure, especially when wedging parameters to find the right values, you will see how to optimize the data and cache only what is needed when it is needed. This will allow the artists to adapt them quickly to revisions and changes in the art direction.
CLASS 1: PREPARE YOUR WORKING ENVIRONMENT
From importing and checking your assets to cleaning and caching the data you need for your simulation. You will learn some best practices that will help later down the road to get shorter simulation times and faster iterations. The goal is to only use what we need and get rid of any data that is useless to our simulation.
CLASS 2: ANTICIPATE AND BUILD YOUR WORKFLOW
Now we have all the assets we need and only the data that is relevant for our simulation, we are going to quickly setup a basic smoke simulation workflow. We will go through the default Pyro setup that ship with Houdini and learn from it. Then build our own smoke simulation network. At this point we do not aim for a particular look or behaviour, we only check everything is going fine on the technical side. Our goal is to anticipate our workflow and identify potential issues.
CLASS 3: VOLUME SOURCING SETUP
Starting with the shelf tool and studying the default volume sourcing workflow, we will see its constraints and limitation for our needs. We will then build our own volume sourcing workflow to overcome these limitations. We will take special care in preparing our emitters because a good emission is a crucial part of a good simulation. Our goal here is to setup our emitter with the maximum control that we can anticipate to introduce as many details as possible into the simulation.
CLASS 4: STEPPING AND HOW TO AVOID IT
In this class, we will see two methods that will help us avoid stepping in the emission while avoiding caching subframes to disk. A description of the pros and cons of both methods will be given so you can decide which best fits your needs.
CLASS 5: ADDING MORE VARIATIONS AND CONTROLS - PART 1
In this lesson, we will further improve our volume sourcing from rigid body chunks and particles. Expressions and VEX wrangles will help us extract useful data (speed, id…) from the RBD animation to build a procedurally controlled volume emission. Emission envelopes, scale-able resolution and noise settings will be applied to the resulting source volumes.
CLASS 6: ADDING MORE VARIATIONS AND CONTROLS - PART 2
This second part will add further controls to our procedural emission. We will use the facing ratio of our fragments to choose where to emit dust from their surface and define an age attribute to vary the emission time per fragments.
CLASS 7: BLOCKING THE SIMULATION
Fx artists are animators, only they animate things that can't be, or would be too tedious, to animate by hand. So the first step is to create a blocking of your simulation. We will learn how to make a relevant selection of references to help us build realistic movement for our dust. Our goal here is to give the main intention, the main movement to the dust and have it validated by our supervisors.
CLASS 8: INITIAL VOLUME CACHING AND RENDER TESTING
In this class, we will import our simulation in the geometry context, optimize it for cache and write it to disk. We will then setup a basic render setup to finalize our workflow all the way up to rendering.
CLASS 9: AUTOMATING YOUR WORKFLOW WITH HOUDINI
Houdini introduced the Procedural Dependency Graphs technology in version 17.5. We will see how to automate our simulation and rendering process with a basic TOP network. With it, you will be able to launch a simulation at night and have a video ready in the morning for the dailies session.
CLASS 10: COLLISIONS
In this class, we will cover the collision process and learn some best practices along the way. You will learn how to visualize correctly the colliders involved in a simulation, so you can troubleshoot collision related issues.
CLASS 11: IMPROVING THE SIMULATION - PART I
In this lesson, we will finalize our emitters from rigid body chunks and particles and learn how to noise the velocity emitted. We will use attribute wrangles to weight our resulting noise with the speed of the fragments to add further procedural control to the emission. We will also see how to separate this noise to control its emission independently during the simulation.
CLASS 12: IMPROVING THE SIMULATION - PART 2
We will further shape our simulation with forces, gas microsolvers and masks. We will apply gas disturbance and see how to layer up several of them to complexify the resulting movement. You will also learn how to create additional fields in your simulation with DOP microsolvers, and we will build a mask to localise the disturbance effect to some selected parts of the simulation. Additional emitters will also be created to help us have more control over the direction of our dust. We will go through a basic versioning workflow and see how to use HScript/python expressions to version your simulations on disk.
CLASS 13: LIGHTING FOR DUST EFFECTS
Lighting volumes can be tricky, and because of their transparency, they can appear really flat if not lit correctly. We will see how to use our three-point lighting setup to reveal the features and details of our dust.
CLASS 14: SHADING THE VOLUME WITH THE PYRO SHADER
In this class, we will review the Pyro Shader parameters related to the smoke appearance. We will cover the most important ones that can help you bring more control and add realism to the look of your smoke. You will learn how to add and cache the rest fields from the DOP Network and use them to control the noise on the shader.
CLASS 15: AOVS, SHADOWS AND TECHNICAL PASSES
We will now set up the AOVs and technical passes that will help in compositing. We will learn how to set up a shadow pass, as well as a Red / Green / Blue lighting separate render pass. We will also see how to extract useful information from the lights and simulation fields. Finally, we will discuss the relevance of some volume AOVs and explain their limits.
CLASS 16: ADAPTING YOUR SIMULATION ACCORDING TO ART DIRECTION
The brief changed since your blocking has been approved and you have to adapt your simulation to meet both the new art direction and the deadline. You will learn through this process how to get ready for finalizing a shot in production. In this first of two parts class, we will focus on improving the impact.
CLASS 17: RETAKES PART II AND FINAL SETTINGS
In this second part of the class, we will help the fluid make some nice vortex patterns and add a windscreen left to screen right. Then, the final high-resolution volume will be cached and optimized settings for rendering and shading will be set to produce the final result. We will go through a final checklist to ensure everything is fine for our final simulation. And just before launching our final simulation, we will see how TOPs will help us quickly adapt our scene to the new editing frame range that production just gave us.

版权声明
1. 本站出于学习和研究的目的提供平台共会员进行交流和讨论,网站资源由会员从网上收集整理所得,版权属于原作者。
2. 网站所有资源是进行学习和研究测试之用,不得以任何方式用于商业用途。请在下载后24小时删除。
3. 灵感中国非常重视知识产权,如有侵犯任何第三方权益,请发邮件(linggancg@foxmail.com)及时联系,邮件请附(专利证书、商标注册证、著作权证书,以及知识产权人授权投诉方进行投诉的证明文件等有效证明),我们将第一时间核实并删除侵权帖子(3个工作日内处理完并邮件答复)。
本文地址: https://www.lingganchina.com/thread-16761-1-1.html
|
|
 Blender电影《沙丘》飞船穿梭行星视效制作3611 人气#Blender
 3dsmax逼真火车头建模纹理完整制作工作流程3508 人气#3DS Max
 Tabitha Park 美食摄影布光,设备,造型及后3564 人气#摄影教程
 摄影师Lucia Marecak专业动态美食食物摄影3512 人气#摄影教程